Showing posts with label Measurement. Show all posts

Let Us Weigh Lettuce

An easy lesson in measuring mass, collecting data, graphing (if you wish), percentages and plants. And a great experiment to start at the beginning of the school year.

You'll need a leaf of lettuce and a balance.  The precision of an electronic balance is nice for this particular activity, if you have one available.

If you have a balance that can remain dedicated to this activity, you can place the lettuce leaf right on it.  Record the mass.  Each day when the students come to class, they should record the mass of the lettuce.  Continue recording the mass every day for a month.

[If you cannot dedicate a balance to the activity, you'll need to first find the mass of a weighing paper.  Record that, then place the lettuce on the weighing paper and record that mass.  Lift the paper with the lettuce on top and keep in a safe place while the balance is being used elsewhere.  Return the paper and lettuce to the balance each day to find the mass.  You'll have to subtract the mass of the weighing paper from each measurement to get the mass of the lettuce.]

Once you've collected all the data, you can graph it if you wish.  Is the water lost at the same rate throughout the month or does it change?

You can also determine how much of lettuce (by mass) is water.

Mass of lettuce at start - Mass of lettuce at end = Mass of water

(Mass of water / Mass of lettuce at start) * 100 = % of lettuce mass that was water

If you've caught your students' attention with this one, you can proceed to follow the same procedure to find the water content in other items.  Maybe your students will want to compare the water content in different types of lettuces or different types of leaves or different types of fruits or vegetables.  Lots of possibilities - you could have something going every month of the school year!

Zack's Alligator: Measurement and Graphing Exercises


Zack's Alligator is the story of a boy who is given a tiny alligator on a key chain, with the instructions to water her every day.  When given water, Zack's alligator grows and grows and they're off on all sorts of adventures. 

You can have your own adventures in science with a growing alligator.  (Of course you can use another other "Growing" animal, the alligator just complements the book nicely).


Before you place the alligator in any water, take some measurements.  The number and type of measurements you take will depend upon the age of your students.  Some possibilities:
  • Length (nose to tail)
  • Width - across the head
  • Width - from toe to toe
  • Thickness
  • Mass
  • Volume
  • Density (not a measurement, but could be calculated if you have mass and volume data)
I did this with a very young student, for whom measurements are meaningless, so we traced around the alligator.   (FYI, I used the back side of a sheet of freezer paper - I could get a nice long sheet of paper, and it's plasticated, which was important since future tracings would be made when the alligator was wet).

After measuring, the alligator can be placed in a large tub of water (you want to make sure it has room to grow). 

Each day, for about a week, take each of the measurements.

At the end of the week, you'll have a collection of data.

Our data was a picture, showing the alligator's growth:

If you have numerical data, you can create graphs that illustrate the rate of growth.  You can then analyze whether the alligator grew faster in one dimension than another or if they all grow at the same pace. 

Measurement: The Symmetrical Human Body

Practice measuring length while learning a little more about your body.

The human body is proportioned with almost exact symmetry.  This symmetry allows a ballerina to leap gracefully, an athlete to run fluidly and a child to stop suddenly.  It also gives each of us the balance we need for our organs to function healthfully.

The human body's proportions are often expressed in terms of the length of your head.  Measure the following lengths and see how closely your body fits the mold. (These measurements are for adults, your students might not fit them yet as proportions change as we grow into adulthood).

Record all measurements in cm.

Measure the length of your head. ____ cm

The height of an adult is 8 times the length of the head, or 8 "heads".  Your height is ____ cm, which is ____ heads.

The distance from your hips to your feet is 4 heads.  This distance on you is ____ cm or ____heads.

The length of your head should equal the width of your waist.  Does it?

Your knees are 6 heads from the top of your head.  This length on you is ____ cm or ____ heads.

The width across the shoulders is 2 heads.  Your shoulder width is ____ cm or ____ heads.

The length of your foot equals 1 head.  Your foot length is ____ cm or ____ heads.

The length of your forearm from the inside crease of your elbow to the wrist bone equals 1 head.  This length on you is ____ cm or ____ heads.

Your waist is 3 heads down from the top of your head.  This length on you is ____ cm or ____ heads.

Your hands reach the middle of the thigh, or 5 heads down.  This distance on you is ____ cm or ____ heads.


**See what other proportions you can come up with.  For example:
--Your forearm is the same length as your foot.
--The length of your pinkie is the height of your ear.

Measurement: Mix & Match Mass

This activity comes from Science Spot. Visit her site to find a ready-made-worksheet (and spend awhile looking around... you'll find a whole year's worth of great activities).

Provide students with a container of objects - I literally wander around my room gathering a collection of objects. Make sure you have objects that have a small mass (1 g or less) as well as larger/more massive objects (not pictured here), and that the sum of masses of all objects totals at least 400 g.

Students choose items (one or many) from the container that they believe will be closest to the target mass. After making their guess, they find the actual mass of the object(s) they selected.

Graphing & Extrapolating: How Many Licks Does it Take?

Last week, we started to find out How Many Licks Does it Take to Get to the Center of a Tootsie Roll Pop.  Last time largely focused on data collection, which is a great skill, but doesn't answer the question at hand. 

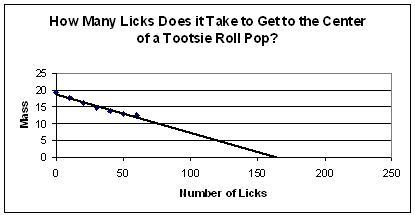
Since we weren't able to complete enough licks to get our answer, we need to graph the data and then extrapolate to find the answer.  You can do this by hand or using Excel. 

Here are the instructions for creating the graph on Excel*
Open a new excel worksheet

Label column A "Number of Licks"

Label column B "Mass"

Fill in number of licks, continuing by 10s until you reach 200 (yes, go to 200 even if you didn't get anywhere near that many licks done).

Fill in corresponding masses

Highlight the numerical data (don't include the column titles in your highlighting)

Go to Insert, then Chart

Click on XY Scatter, then click Next

Click Next

Enter a chart title (name of lab), the x-axis label (Number of Licks), and the y-axis label (Mass (g))

Click Next

Select the option to place the chart as a new sheet

Click Finish

Click on one of the points on the graph - all the points should be highlighted

Go to Chart, then Add trendline

Click Okay

Click on the legend and delete it

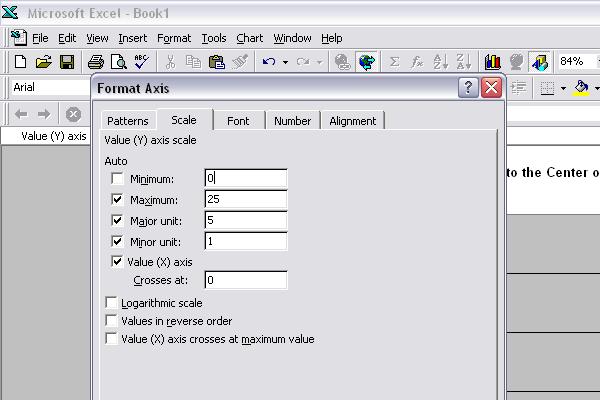
Double click on the numbers on the y-axis.

Click on Scale

Change Minimum to 0

Double click on the background of the graph

Set area to none

Print the graph

Draw a horizontal line at the value you had for the stick and wrapper

At the point where the line you drew hits the line on the graph, draw a vertical line to the x-axis.

Estimate the value for where the line hits the axis - that is the number of licks it would take to get to the center of a Tootsie Roll Pop


*I wrote these instructions using an older version of Excel, which is still what I have access to. If you use a newer version and find that some of the terminology needs to be changed, please let me know.  Also, please let me know if something is unclear or you just aren't sure about something and I'll do my best to help.

Measurement: How Many Licks Does it Take?

Remember the old Tootsie Roll Pop commercial...


This lab addresses that very important question, How Many Licks Does it Take to Get to the Center of a Tootsie Roll Pop? 

There are quite a few scientific skills that go with this lab...
...scientific method
...measuring mass
...collecting data
...graphing data
...extrapolating based on data gathered

For today, we'll focus on the first three things listed.  We'll come back to the graphing and extrapolating next week.

Before we begin, there are a few assumptions being made in this lab
  1. The center of the pop is the stick.
  2. The pop is made of a uniform material.
Question:
How many licks does it take to get to the center of a Tootsie Roll Pop?

Hypothesis:
If I lick the pop _____ times, then I will reach the center.

Procedure:
  1. Measure the mass of the pop and wrapper.  Record.
  2. Lick the pop 10 times.
  3. Measure the mass of the pop and wrapper.  Record.
  4. Repeat steps 2 and 3 five more times (or as many as class time allows). 
  5. Finish the pop.
  6. Measure the mass of the stick and wrapper.  Record.
Graph the data.
You can have the students graph the data by hand and then draw in a best fit line to determine how many licks it would take.  Or you could have the students use Excel to graph the data. 

Teacher Notes:
**Make sure you define a lick before you start.  They can't be "dainty" or they'll never gather enough data and their graph will be unusable.  Define a lick as putting the pop in their mouth, twirl it around once and removing it. 


Tune back in next Monday for step-by-step instructions for creating graph (including the best fit line/trend line) in Excel. 

I know, you aren't sure you can wait a whole week for such exciting information.  Try to contain yourself.  And, while you're waiting, go find yourself a Tootsie Roll pop and start licking... :)

Gummy Bear Lab

This is one of my all-time favorites!

I use this lab at the beginning of the school year, when we're reviewing measurement.  However, it is equallly apprpopriate for the study of osmosis.  (As fate would have it, I first did this lab with my 7th graders who go on to study life science, including osmosis.  When we got to osmosis, they made the connection back to our measurement study.  It was great, and I've never considered doing it any other way, or with any of my other classes).

The procedure is simple enough....

Each student gets a gummy bear*.  The gummy bear gets measured thoroughly: length, width, height and mass.  Volume and subsequently density can be determined.

The gummy bear then spends a night in a cup of water.

When the students return the next day, the bears get measured once more (after students get over the shock of seeing their newly enlarged gummy bear).

Conclusions are drawn.

In my experience, this lab leads to all kinds of questions for further experimentation... What if I place my gummy bear in Coke/tea/milk/etc?  What if I leave my gummy bear in the water for 2 days?  What if I allow my newly enlarged gummy bear to sit out for a day?  What if I use a gummy worm instead of a gummy bear?  If you have the time and resources, it's a great opportunity for students to design their own experimental process and carry it out. 


*I tried to use a gummy worm one time, when I had some at home.  It didn't work, it completely fell apart.  Fortunately, it was just me playing around at home.  For that reason, always do a test run on the gummy bears you plan to use with your students.  You really want a gummy product that's going to hold up, at least for the initial experiment.

Measurement: Volume Practice

Do your students need some practice measuring volume?  Here are some simple ideas to get them up and actively measuring and calculating.

Idea 1:

Raid your children's block shelf.  All different shapes of solids with a length, width, and height that can be measured.  If you don't have children with blocks, see if you can borrow some or check yard sales or thrift stores.  Your blocks don't have to come from one set - variety is good!

Label each block with a letter (use masking tape if you don't want to mark on the block itself).  Calculate the volume of each and create a key.


Idea 2:

Collect empty boxes of a variety of shapes and sizes.  Label each box with a letter.  Calculate the volume of each and create a key.


Idea 3:

Raid your recycling and gather a variety of bottles and jars.  Have your students find the volume of water each jar holds.  (Remove the labels for the jars and bottles, or at least remove the portion that states the volume, if applicable.  Don't worry, stubborn labels will come off with enough student use). 

Again, label each jar with a letter.  Determine the volume of each and create a key.


Save your blocks, boxes and jars and next year you'll be ready to go, with the key and everything.  Just pull it out and have your students get to work!

Measurement: Metric Estimation Game

You could play this game for a whole class period, but it’s also a great time filler – you can play a round or two in the minute while you’re waiting for the bell to ring after finishing the day’s lesson.

Depending upon what you’re currently studying and/or how advanced your students are, you can have them estimate length, mass, and/or volume.

Pick an object at random and have students its length, mass, or volume. Students write down their estimation on a scrap piece of paper (you can collect these if you’d like, but I usually don’t, we just compete for bragging rights). You then determine the actual length/mass/volume.

The more you play, the better your students will get at estimating measurements.

If your students need more of a challenge, you could change up the units you want them to answer in… height of the table in mm, for example.

You can find a similar game here. She uses it as a team event – sounds like fun!

Measurement Homework

This could be completed in the classroom or as a homework assignment.

Find an object in or around your house that is approximately each of the following measurements long. After measuring the object, write the name of the object next to the measurement it’s closest to in length and record the exact measurement of the object (remember to measure to the tenths place!).

Target Measurement Object Actual Measurement
1 cm
2 cm
3 cm
etc.


You could also have students guess which measurement their object will be closest to before measuring.

If you have students who might not have a centimeter ruler at home (or at least claim that they don’t), you can print off paper rulers here.

Check their accuracy after photocopying, just to make sure. Mine have worked out well in the past.

Measurement: Cubic Cm to mL

CENTIMETER CUBES 500-PK
I don't remember how it came up, but one year I was talking with my students about cubic centimeters and how one cubic centimeter is the same as one milliliter.  It's not a concept my students use a lot, but a good one for them to start grasping.  Here's an activity to help them understand: 

Have students determine the volume of a centimeter cube* by measuring its length, width, and height and multiplying.  If done accurately, each of the dimensions should measure 1 cm, which gives a volume of 1 cm3.

Then have them determine the volume by water displacement.  If done accurately, it should have a volume of 1 mL.

There you have it - the same object has a volume of 1 cm3 and 1 mL - they are equivalent units.


*Ask the math and elementary teachers you know - they may have some centimeter cubes you can borrow (or even have) - you only need a few. 

You can then take it a step further... break out some other small blocks (this is a little hard... they have to be small enough to fit in a graduated cylinder).  Have students measure those in cm to determine volume.  Then have them determine volume by water displacement.

Graphing: Growing Monkey


Look around your favorite retailer for these Growing "Things". I've seen turtles, crocodiles, princesses, pirates, etc.

We happened to have a monkey (thanks Aunt Amy - I told you it would show up on here!).

Take some measurements of your "thing" before you do anything with it.

Then place it in water.

Most of these say they'll take up to 72 hours (that's 3 days) to reach full size. I recommend you start on Monday, so you'll have all week to watch it.

Each day, at the same time (or as close as you can come), retake the same measurements you took initially.

At the end of the week, you should have several data points that can be graphed. Older students could determine the rate of growth.

You may even want to have them look at the data after 24 and 48 hours and ask them to predict how large it will grow by 72 hours.

*****
My apologies, my "after" pictures of your monkey didn't turn out, so I don't have much for you. Our monkey about doubled in size. Some of the "things" out there are a lot smaller to start with and claim to increase by 600%, which should give you some great measurements.