CSI Science: Case of the Kidnapped Cookies Days 4 and 5

This post is the fifth in a series of posts about a CSI program I ran at our library.  You can read the background information here and here and here and here

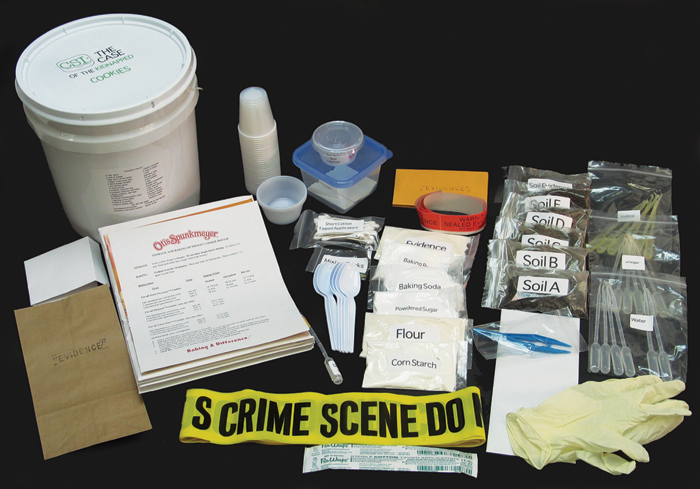
For Day 4 we performed the dirt analysis.  It was fairly straight-forward and completed without much fanfare.  The students once again enjoyed taking the information they collected and comparing it to the map that was provided and then matching up that information with what they found in the suspect bios.

Day 5 was DNA analysis day.  We had a short conversation about what DNA is and I gave them a very simplified explanation of what a lab would do with a DNA sample that would lead to the results we were provided with in the kit.  With all of that in mind, the actual analysis became more of a graph reading exercise than anything else.  But, they did very well with it and enjoyed it quite a bit (I know one person mentioned it has being the favorite activity we did).  Hopefully some small pieces of information will stick with them and will click into place when they're exposed to it again some day.


It was really great to have 5 weeks worth of library programming assembled into one place and ready to use.  As I went through each of the activities, I thought about what/how I might do things if I were designing my own unit (and maybe I will sometime down the road.... add it to the bottom of the to-do list), and while there are changes I would like to make, it's hard to ignore the convenience of having everything ready-to-go.  It would be a major investment of time to gather the supplies for a crime scene set-up and 4 days worth of lab activities, not to mention the time that would need to be spent planning a story line and creating all the other materials: suspect bios, maps, newspapers, ransom letters, etc.  Many thanks to Educational Innovations for allowing us the opportunity to carry out such a comprehensive program while saving my sanity (my family is much appreciative)!


*****
The Case of the Kidnapped Cookies Kit was provided to me at no cost, for use with a group of students at my library.  I was not compensated by Educational Innovations in any other way, and all opinions expressed are my own.

CSI Science: Case of the Kidnapped Cookies Day 3

This post is the fourth in a series of posts about a CSI program I ran at our library.  You can read the background information here and here and here.


Day 3 found us analyzing the red marks on the ransom note envelope. It was (somewhat mysteriously) determined that the red marks are lipstick and lipstick samples from each suspect have been collected.


This is the only part of the unit that requires you to gather your own materials.  The kit comes with one lipstick sample, and it's necessary to come up with 3 additional samples, as well as some acetone to act as solvent.  This was the only part of this product that I found frustrating.  For all of the other materials included, it seemed silly that the lipstick was not.  It wasn't terribly hard to find inexpensive lipstick to use for the activity, but once you remove a chunk of the lipstick to have available for testing, it makes the rest of the lipstick fairly useless (and there's a lot of it left).

I'd recommend having your students perform a different chromatography experiment prior to this investigation (a simple black marker chromatography works great). The results of our lipstick chromatogaphy were basically all the same, and these students, being unfamiliar with the process, were looking for differences that just weren't there.  I think that if they had some background with the process, they'd better understand what different results look like (and how fun it can be to watch the colors separate).
Some of our chromatography strips.

The best part of this activity was the container provided to run the chromatography in.  It was a small plastic container, like you might get in the deli of a grocery store.  At first I was very skeptical of how it work, but it turns out, it was great!  There's a small ridge in the bottom of the container, and you can prop the chromatography paper strips up along that ridge.  You only need a very small amount of solvent, and you don't have to mess around with trying to suspend the paper strips from a pencil and trying to get height of the strips and the height of the solvent appropriately aligned.  I'll definitely try it that way again!


After we finished the chromatography, some students worked on putting their word-by-word Spanish translation together into something that made sense and others worked on determining which newspaper(s) the letters on the ransom note had come from.

Throughout the meeting (and all the others for that matter), the students regularly returned to the suspect bios to compare what new information they'd learned with the information about the suspects.


*****
The Case of the Kidnapped Cookies Kit was provided to me at no cost, for use with a group of students at my library.  I was not compensated by Educational Innovations in any other way, and all opinions expressed are my own.

CSI Science: Case of the Kidnapped Cookies Day 2

This post is the third in a series of posts about a CSI program I ran at our library.  You can read the background information here and here.


On day 2, we got to dive into the laboratory procedures with a white powder lab. Once again, all of the materials were provided (even water!), which was wonderful!  It was really great to arrive just before the students and get right to work - no long hours of prep work!


Being a small group, we all worked together, so each kid got to see exactly how each powder reacted to each test, which was nice.  Also, we used magnifying glasses instead of a microscope.  A microscope probably would have been more fun, but we used what we had and it worked just fine.

The second activity of the day was to try to decipher the ransom note.  I assume that students with even a small background with Spanish would have quickly recognized at least part of the letter as being in Spanish.  But, this group was really unfamiliar with the foreign language, so there were all sorts of thoughts on what it might be.  One of their thoughts was that it might be Spanish, and they eventually got to the point where they realized that if it was Spanish, they could use a computer to help them translate it.  They worked on their translations until it was time for them to leave, and we returned to it the next week.

*****
The Case of the Kidnapped Cookies Kit was provided to me at no cost, for use with a group of students at my library.  I was not compensated by Educational Innovations in any other way, and all opinions expressed are my own.


CSI Science: Case of the Kidnapped Cookies Day 1

This post is the second in a series of posts about a CSI program I ran at our library.  You can read the background information here.

As mentioned earlier, our program was advertised for 3rd through 8th graders.  At our first meeting we had the following patrons attend:

  • a 6th grade boy 
  • two 5th grade girls
  • a 4th grade girl
  • a 3rd grade boy
  • a 3rd grade girl
  • a 2nd grade girl

The 6th grade boy didn't attend after the first meeting (he was hoping to be part of an older group), but the rest of the group remained consistent throughout the 6 week program.  They were a blend of 2 homeschool students and 4 pulic school students.  And they all came from unique families - no siblings.

Because it was a small group and a young group, we did a lot of the work together.  It was a much more casual effort than it would be if I were using this in a classroom setting - we tended to keep one data sheet and just talk through the questions.


Since the "story" surrounding the crime takes place in a school and we were clearly not in that setting, I used the suggested "excuse" that I had read about the crime in the paper and thought it would be interesting to try to recreate the crime scene and solve it ourselves.  In the end, it didn't really matter what I said.  This group of kids just wanted to solve the crime, it didn't matter to them where it had come from.


 Before started the outlined procedures, I wanted to provide the group with some crime scene/forensic science terminology.  I used the Crime Scene Basics PowerPoint and student worksheets from The Science Spot, tweaked slightly.  [Side Note: If you're planning a forensic science unit (or any other unit, for that matter), I highly recommend you check out The Science Spot - Tracy has so many materials for you on her site.  It's a wonderful collection that I can't say enough about!]   Most of the students were familiar, at least on some level, with the terms, so we were able to go though it pretty quickly; and it ensured that everyone was using the same 'language'.

Day 1 of the investigation calls for an analysis of the crime scene and collection of the evidence.  The crime takes place in a kitchen - the community room attached to our library has a kitchen area, so that made things simple.  The book that comes with the kit tells you exactly what you need to do.  All of the materials are included in the kit and the set-up only took a few minutes. Perfect!

The kids really enjoyed checking the crime scene out and speculating what each of the items might be - especially those strange red marks on the envelope!

The kids did draw simple maps of the crime scene.  Because it was a pretty young group, we didn't worry about drawing it to scale.  The kids also spent some time reading through the suspect bios, but we didn't worry about taking copious notes.  With such a small group, they could all access the bios any time they needed to without any problems.


*****
The Case of the Kidnapped Cookies Kit was provided to me at no cost, for use with a group of students at my library.  I was not compensated by Educational Innovations in any other way, and all opinions expressed are my own.

CSI Science: The Case of the Kidnapped Cookies

This post (and the ones that follow) has been in the works for a long time.


Quite a while back, I got in touch with the folks at Educational Innovations (I've written about them before, here) and we began talking about a possible collaboration.  Last spring, I was finishing up a series of science club programs at our local library (where I work part time), and the folks at Educational Innovations decided they'd like to provide something for me to use with a future science club.

The conversation was tabled for a bit, as I had already established my plans for last summer, and I wasn't planning any science programming for the fall.  When we began talking again, it was decided that Educational Innovations would provide me with a Case of the Kidnapped Cookies Kit to use with a group of kids at the library, to be used this spring.

Somewhere in the middle of our planning, communication got cut off for a time.  Since, for a time, I wasn't sure if I was going to receive the product or not, I started looking at alternatives, since I still had some programming hours that needed to be filled.  There are lots of forensic science lesson plans out there, and I knew I could come up with a story and pull several different CSI techniques/elements into it,  but I really was hoping to find something that had everything pulled together for me.

I eventually found, and was able to get my hands on, Mystery Festival: Teacher's Guide (Gems) , which was exactly what I was looking for - it was a whole CSI unit, with the story already written, materials lists, and a comprehensive list of what prep work needed to be done for each day of the unit.  Perfect, except it was still a lot of work and I wasn't really feeling up to putting that much effort into this series of programs.


But, I was in luck - communication with Educational Innovations resumed and my kit arrived quickly after that.  After spending the time looking into what it would take to pull together my own unit, it was so fabulous to open the box and have everything ready and waiting for me!

Picture from  Educational Innovations.  The contents in mine were packaged slighly differently, but the same materials were included.  
This kit is intended to be used over the course of 5 days (more if you wish to stage a trial at the end); and is intended to be a cross-curricular undertaking.  Each day includes multiple lessons - one to be completed in science class, the other one or two to be completed in other classes - math, English, Spanish, social studies.

I scheduled 5 meetings of our group to work our way through the different lessons and come to a conclusion.  We advertised the program as being open for 3rd - 8th graders.  It probably would have been ideal to keep the group to the older end of that range, but, as a rule, we struggle to get that age group to participate in library programs.

I'm going to break down what we did each day and how it went in some additional posts, so this doesn't get too long.


*****
The Case of the Kidnapped Cookies Kit was provided to me at no cost, for use with a group of students at my library.  I was not compensated by Educational Innovations in any other way, and all opinions expressed are my own.

Mapping the Solar System

I recently encountered this activity for the first time, on the McDonald Observatory website.  I've since found the same activity on numerous other sites.  I don't know where it came from first, but I'll give credit to the place where I first saw it.

Anyway... it's a super simple way for students to map the solar system and get a feel for how much distance is between the planets.  In short, it's brilliant!

Each student will need a sentence strip or a length of adding machine/calculator paper.


Hold the paper vertically and label (in small letters) one end of the strip "Sun" and the other end "Pluto".

At this point, you can have students fill in the planets with their best guesses as to their placement.  Or you can just make the accurate map.  It's up to you and your situation.

To make the map:
Fold Pluto to the Sun.  Label Uranus on the crease.
Fold Pluto to Uranus.  Label Neptune on the crease.

 Fold the Sun to Uranus.  Label Saturn on the crease.
Fold the Sun to Saturn.  Label Jupiter on the crease.
Fold the Sun to Jupiter.  You can label the crease Asteroid Belt or leave this space blank.

Fold the Sun to the Asteroid Belt.  Label Mars on the crease.
Fold the Sun to Mars. Label Venus on the crease.

Label the space between the Sun and Venus, Mercury.  (You could fold the Sun to Venus and label the crease, but the space gets a little tight to make more folds at this point).

Label the space between Venus and Mars, Earth.

That's it!  You've completed your map!  And it's incredibly accurate for such a simple model.

I'm thinking it might be fun to convert distances to some other notable bodies in the cosmos to this scale and lay out the sentence strips to show kids the vast amount of space in space.  I'll let you know what I come up with!

Shaving Cream + Corn Starch

I'm not sure how to categorize this one, but it's a fun concoction to make and play with.  It'll definitely be part of our slime day at the library, even if it's not actually a slime!

Pour some corn starch into a bowl.  Squirt in some shaving cream, about the same amount as you have corn starch.  You're just eyeballing it. Quantities aren't terribly important and you can always adjust amounts as you go along.

Dive in with your hands and start squishing it all together - a very tactile experience!

It will become a soft clay that you can mold into all kinds of shapes.  As time goes on, the clay will get stiffer.

So much fun!!

Polymers: Glue + Liquid Starch

I've been playing with around with recipes to make assorted slimes and such in preparation for a library program this summer.

A simple slime to concoct uses glue and liquid starch (you can find it in the laundry aisle)


You can find people using all different proportions, but I use about equal amounts of each (I eyeball it) poured into a cup.  You can add food coloring to the mixture as you desire.  Stir until things gel up (if it's too sticky, add more starch).  Then you can knead it with your hands.  (You can rinse off any extra starch).  As you play with it, it will become more smooth and gel/putty like.

You might also want to try using clear glue, with or without food coloring for a different effect.

Science in the Library

For the past couple of years, I've been working part-time in our local library.  In addition to typical library duties (checking out books, shelving books etc.), I've taken on responsibility for much of the children's programming that goes on at our location.

I've started a blog to share some of those programming ideas with others.  I get so many ideas from the Internet, I want to give back what I can.

I thought I'd share the news here, as I know many of the Science Matters readers work with groups of children in a variety of settings. I have to keep things flexible, as I never know how many people will show up for the program or exactly what the age make-up will be.  I'll let you know my contingency plans for each activity!

Given my background, it's probably not much of a  surprise to hear that much of the programming has a science spin to it.  In fact, we've started three science clubs at the library this spring.  I'll likely cross-post the science ideas to the Science Matters blog, so the people interested in just science content can find it all in one place.

Winner, winner

The winner in our Top Ten Household Objects comment contest is...

Mrs. M at Orchard View!!!


Thanks to everyone who participated and make sure you check out those comments to find some more great ideas!

More new stuff later this week!


Top Ten Household Items #1

#1 on the Top Ten List of Household Items to Use in Your Science Classroom is:

Food Coloring

Definitely a worthy winner!  I use it all the time and I'm sure there are lots more ideas to add to the list!


Tie-Dye Name-tags
Beads of Color
Capillary Action in Action
Frustration Bottles
Mixing Colors
States of Matter
Diffusion Demonstration
Finding Equilibrium (Water)
Salt Water Painting 
Solubility Fireworks
Magic Marble
Milk Fireworks
Sugar Density Column
Contact Lens Safety
A Hole in the Water
Celery in Colored Water
Egg-speriment

Comment on this post to be entered to win a prize box containing most of the Top Ten Items.  And remember, if your comment contains an additional use (not mentioned above) for food coloring in the science classroom, you'll receive a bonus entry!


Top Ten Household Items #2

#2 on the Top Ten List of Household Items to Use in Your Science Classroom is:

Pennies

Pennies have so many great uses in the classroom!  What can you add to the list?


Penny boats
Penny Passengers
Genetics Penny Flip
Inertia Penny Finger
Penny Knock Out
Penny in a Cup
Drops on a Penny
Half-Life Model
Spot the Penny (refraction)
Projectile Motion
Penny in a Balloon
Salt, Vinegar and Pennies (chemical changes)
Balance a Lever

Comment on this post to be entered to win a prize box containing most of the Top Ten Items.  And remember, if your comment contains an additional use (not mentioned above) for pennies in the science classroom, you'll receive a bonus entry!

Top Ten Household Items #3

#3 on the Top Ten List of Household Items to Use in Your Science Classroom is:

Balloons

I didn't even realize how often I used balloons in the classroom... And I don't think this is a complete list! Share your ideas in the comments!

The Expanding Universe
Blow up a Balloon in a Bottle
The Importance of Cell Walls
Penny in a Balloon
Ideal Gas Law with a Balloon
The Shape of Molecules
Balloon in a Flask
Model Lung
Steel Wool and Vinegar
Bending Water
Cellular Respiration in Yeast
Build a Coral Reef
From Solid and Liquid to Gas
Bernoulli Balloons


Comment on this post to be entered to win a prize box containing most of the Top Ten Items.  And remember, if your comment contains an additional use (not mentioned above) for balloons in the science classroom, you'll receive a bonus entry!

Top Ten Household Items #4

#4 on the Top Ten List of Household Items to Use in Your Science Classroom is:

Vinegar

Vinegar is a great item to have on hand - it's a key component in many simple and safe chemical reactions


Seashells and Acidification
Egg-speriment
Steel Wool and Vinegar
Salt, Vinegar and Pennies
The Importance of Brushing Your Teeth
Baby Birds and Acid Rain
Why You Need Calcium
From Solid and Liquid to Gas
Erupt a Volcano
The Cabbage Caper
Mystery Solutions Lab
pH of Household Substances

Comment on this post to be entered to win a prize box containing most of the Top Ten Items.  And remember, if your comment contains an additional use (not mentioned above) for vinegar in the science classroom, you'll receive a bonus entry!

By the way, vinegar won't be included in the prize box - can't figure out how to ship that easily.  Guess I'll have to find a special surprise item to take its place!


Top Ten Household Items #5

#5 on the Top Ten List of Household Items to Use in Your Science Classroom is:

Salt

Before I started compiling this list, I was certain that salt would end up in the top spot or two.  It seems like I'm constantly pulling it out of the cupboard for one reason or another!

I bumped it down a little on this list, because I just didn't have as many activity links to share as I did for some of the contenders.

I'm sure you'll share lots more ways to use salt in science lessons!  And take some time to try some of these ideas:

Salt Water Painting
Salt, Vinegar and Pennies (chemical change)
The Mistake
Should I Salt My French Fries Before or After
Float an Egg
Semipermeable Membranes
Growing Crystals

It's also really great to look at under a stereoscopic microscope, if you happen to have access to one!

Comment on this post to be entered to win a prize box containing most of the Top Ten Items.  And remember, if your comment contains an additional use (not mentioned above) for salt in the science classroom, you'll receive a bonus entry!


Top Ten Household Items #6

#6 on the Top Ten List of Household Items to Use in Your Science Classroom is:

Index Cards

To be honest, I didn't even consider index cards in my initial list of possible items.  But there are so many ways to use them, beyond just flashcards!

Flatten an Index Card
Index Card Slides
Step Through an Index Card
An Index Card and a Cup of Water
A Penny for Your Finger
Mystery Jars
Penny in a Cup
Layered Water
Mitosis Line-Up
Boat Races
Photosynthesis Races
Flip an Arrow
Water Drop Microscope
Jumping Frog

Comment on this post to be entered to win a prize box containing most of the Top Ten Items.  And remember, if your comment contains an additional use (not mentioned above) for index cards in the science classroom, you'll receive a bonus entry!


Top Ten Household Items #7


#7 on the Top Ten List of Household Items to Use in Your Science Classroom is:

Sugar

Granulated sugar can find its way into plenty of science activities, but I find that sugar cubes lend themselves to even more possibilities.  And, you can always crush the cubes to get granulated sugar!

Sugar Cube Rock Cycle
Sugar Cube Solubility
Sugar Density Column
How Much Sugar in a Can of Soda?
Sugar Cubes in a Flask
The Floating Letter
The Big Green Mixing Bowl

Comment on this post to be entered to win a prize box containing most of the Top Ten Items.  And remember, if your comment contains an additional use (not mentioned above) for sugar in the science classroom, you'll receive a bonus entry!


Top Ten Household Items #8


#8 on the Top Ten List of Household Items to Use in Your Science Classroom is:

Play Doh

Play Doh gets bonus points because you can easily make your own in the colors and quantities you desire, with minimal materials and effort!

After you've got it made, try out some of these ideas:

Color Mixing
Earth vs. Moon Volume Comparison
Make a Topographic Map
A Look Inside Folds and Faults
What's Inside?

Comment on this post to be entered to win a prize box containing most of the Top Ten Items.  And remember, if your comment contains an additional use (not mentioned above) for Play Doh in the science classroom, you'll receive a bonus entry!


Top Ten Household Items #9


#9 on the Top Ten List of Household Items to Use in Your Science Classroom is:

Dried Beans

I love having a stash of a few different kinds of dried beans/peas/lentils on hand.  Try out these activities:

Seed Germination
Semipermeable Membrane Demonstration
Dissect a Seed
The Geologists' Dilemma
Renewable vs. Non-Renewable Resources

Comment on this post to be entered to win a prize box containing most of the Top Ten Items.  And remember, if your comment contains an additional use (not mentioned above) for dried beans in the science classroom, you'll receive a bonus entry!